TL;DR –
To decorate a cake for graduation, begin with a smooth sheet cake or layer cake that comfortably feeds your guest list. Frost it in the graduate’s school colors or classic celebration shades like black, white, gold or silver. Add recognizable graduation elements such as a cap, diploma scroll, tassel or the graduation year. Write a short, bold message like “Congrats Grad” or “Class of 2026,” making sure it’s easy to read in photos. Finally, personalize the cake with symbols that represent the graduate’s next chapter, whether that’s college, career, sports, or a special achievement.
The key is balance: keep the design clean, the message clear, and the theme meaningful. A graduation cake doesn’t need to be complicated to be impressive. When colors, symbols,s and personalization work together, even a simple cake becomes a memorable centerpiece for the celebration.
Key Takeaways
- Choose a cake style that fits your guest list (sheet cakes feed more people).
- Use school colors for instant graduation impact.
- Add graduation-themed toppers like caps, diplomas or tassels.
- Write the graduate’s name and year clearly and boldly.
- Personalize with career symbols, favorite flavors or photo toppers.
- Keep decorations neat and readable for photos.
Table of Contents
- Key Takeaways
- The Easiest Way to Decorate a Graduation Cake
- Step 1: Choose the Right Cake Base
- Step 2: Smooth the Frosting First
- Step 3: Add School Colors Strategically
- Step 4: Add Graduation Symbols
- Step 5: Write a Clear Graduation Message
- Step 6: Personalize It for the Graduate
- Step 7: Keep It Photo-Ready
- Simple Decoration Ideas (Quick Inspiration List)
- Final Thoughts
- Common Questions
The Easiest Way to Decorate a Graduation Cake
If you’re wondering how to decorate a cake for graduation, here’s the straightforward answer: focus on school colors, graduation-themed decorations, and a personalized message on a smooth, easy-to-serve cake. You don’t need professional piping skills or advanced fondant techniques. What matters most is clarity, celebration, and thoughtful details.
Graduation parties usually bring together family, friends, classmates,s and lots of cameras. That means your cake should do three things well:
- Feed a crowd comfortably
- Look bold and photo-ready
- Reflect the graduate’s achievement and plans
Large sheet cakes, easy layer cakes, cupcakes, and even ice cream cakes are popular options for graduation parties because they’re practical and serve many guests. Food-focused platforms like Taste of Home often feature these crowd-friendly cake styles because they’re reliable, easy to decorate,e and perfect for celebrations.
The best graduation cake decorations balance simplicity with impact. A smooth frosting base gives you a clean canvas. School colors instantly communicate the theme. A cap or diploma topper makes it unmistakably graduation-focused. And adding the graduate’s name or class year makes it personal.
Whether you’re baking from scratch or decorating a store-bought cake, this step-by-step guide will help you create a graduation cake that feels meaningful, polished, and celebration-ready without stress or overwhelm.
Let’s break it down step by step.
Step 1: Choose the Right Cake Base
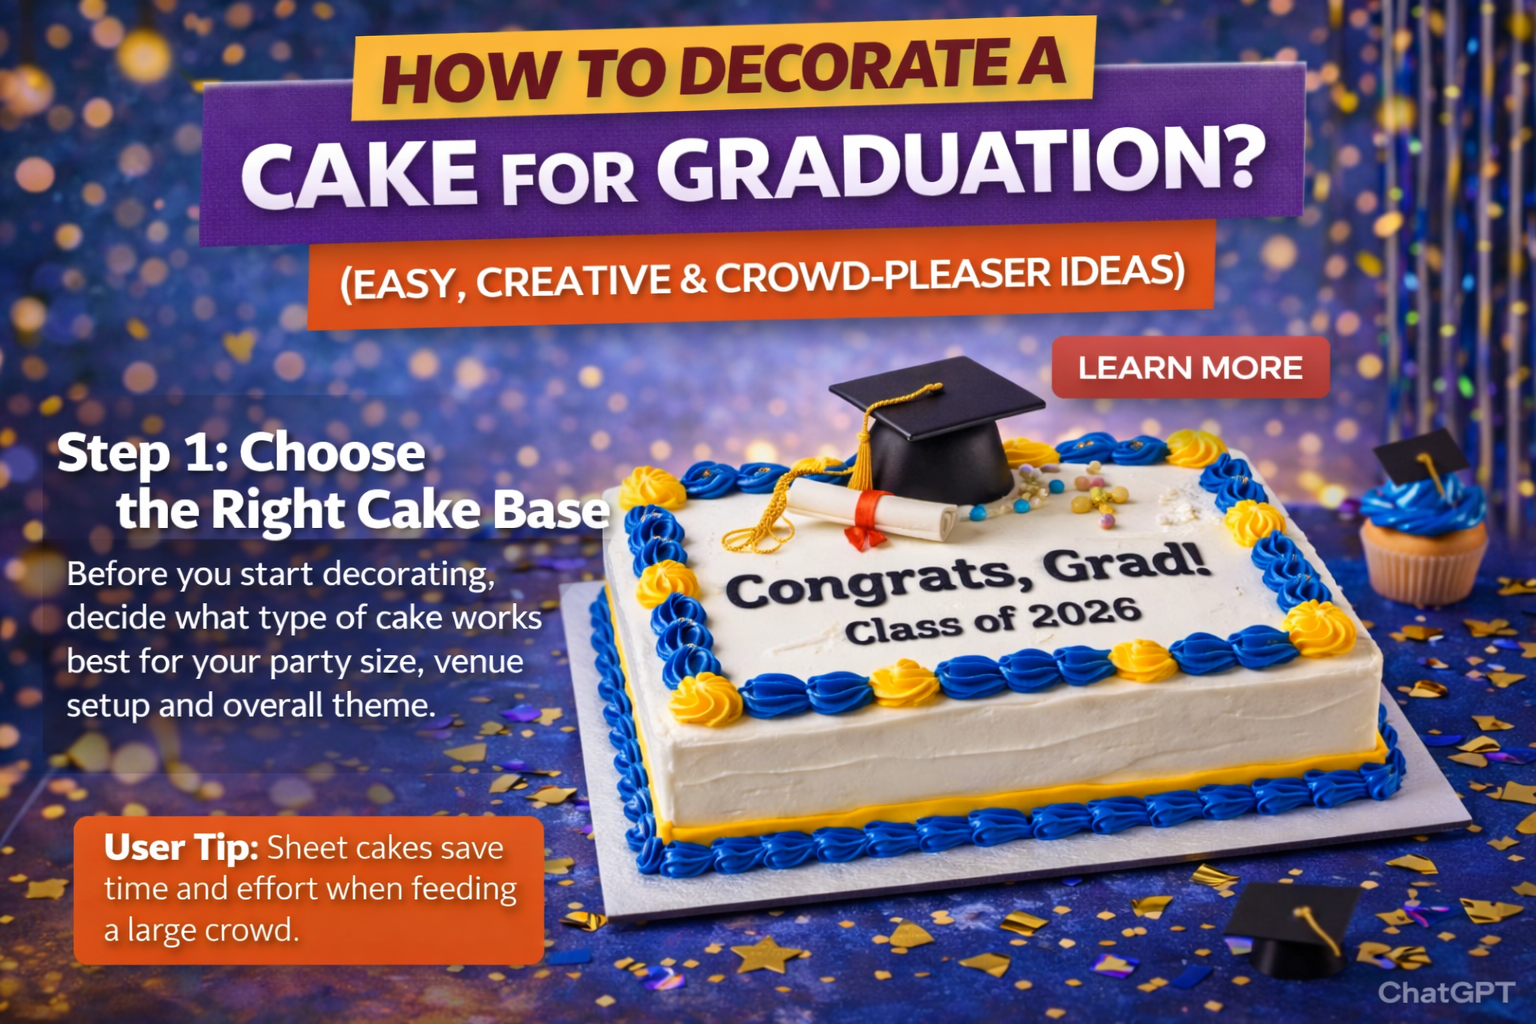
Before you start decorating, decide what type of cake works best for your party size, venue setup and overall theme. The base you choose affects how easy the decorating process will be and how smoothly serving goes during the celebration.
1. Sheet Cake (Best for Large Parties)
A sheet cake is the most practical and beginner-friendly option. It typically serves 15–24+ guests depending on size, making it ideal for graduation parties with extended family and friends. The large, flat surface gives you plenty of space to pipe messages, add the graduation year, create borders in school colors and place toppers neatly in the center.
Sheet cakes are also easier to transport and slice compared to tall layer cakes. If you want a stress-free decorating experience with maximum visual impact, this is your safest and smartest choice.
2. Ice Cream Cake (Great for Summer Graduations)
Ice cream cakes are perfect for warm-weather celebrations, especially for late spring or summer graduations. They feel festive and refreshing, and guests of all ages usually love them.
Since ice cream cakes soften quickly, keep decorations simple. Use piped whipped topping borders, school-color sprinkles and a sturdy topper like a graduation cap. Avoid heavy fondant decorations that may slide. Also, plan freezer space and serving timing to keep everything looking clean.
3. Cupcakes or Pull-Apart Cakes
Cupcakes are ideal if you want easy portion control and quick serving. They eliminate the need for cutting and reduce wait time at the dessert table. You can top each cupcake with mini graduation caps, edible stars or the class year.
Pull-apart cakes (cupcakes arranged together to form a shape) are especially creative. Arrange them into “2026,” a graduation cap or even the graduate’s initials. Frost them together so they look like one large design while still serving individually.
User Tip: If you’re feeding a large crowd and want decorating to be simple, sheet cakes save time and effort while still looking impressive. If you prefer convenience and minimal mess, cupcakes are your best option.
Step 2: Smooth the Frosting First
A clean, smooth base makes every decoration look more professional and polished. Even simple designs stand out when the frosting surface is neat and even. Taking a little extra time here will dramatically improve the final result.
Start by applying a thin crumb coat this is a light layer of frosting that seals in loose crumbs. Spread a thin layer over the entire cake, then chill it in the refrigerator for 20–30 minutes. This step prevents crumbs from mixing into your final frosting layer and keeps the finish clean.
Next, add a thicker final layer of buttercream. Use an offset spatula to spread it evenly across the top and sides. Don’t worry about perfection at first focus on covering the cake fully.
To smooth the surface, use a bench scraper or straight spatula. Hold it at a slight angle and gently rotate the cake (or move the scraper steadily around it). For an extra-smooth finish, dip your spatula in warm water, wipe it dry and lightly glide it over the frosting.
When choosing colors, neutral shades like white, cream or light gray create a clean canvas for writing and decorations. If you’re using school colors, keep one shade dominant and use the second as an accent for borders, lettering or small details. This prevents the cake from looking too busy while keeping the graduation theme clear and bold.
Step 3: Add School Colors Strategically
Graduation cakes instantly feel personalized and meaningful when you incorporate school colors. This simple step ties the entire design to the graduate’s journey and makes the cake look intentional rather than generic.
However, balance is important. Too many bold colors can overwhelm the design. Instead, choose one main color and one complementary accent shade to keep the cake clean and visually appealing. Other things like cake toppers, sprinkles, print images, etc.
Ways to Use School Colors:
Two-tone frosting: Use one color for the top and another for the sides. This creates contrast and adds dimension without making the cake look busy.
Piped borders: Add school colors around the top and bottom edges using a star or round piping tip. Borders frame the cake and make it look complete.
Ombre frosting effect: Blend lighter and darker shades of the same school color from bottom to top. This technique looks modern while staying elegant.
Sprinkles or edible confetti: Use school-color sprinkles for a quick, beginner-friendly way to add theme and texture without advanced piping skills.
When adding lettering, always maintain a strong contrast. For example, dark text on a light background or metallic gold on deep navy makes the message easier to read, especially in photos. Graduation cakes are often photographed, so clarity matters just as much as creativity.
Also read – how to decorate a chocolate cake for halloween
Step 4: Add Graduation Symbols
This is the step that truly transforms a regular cake into a graduation celebration centerpiece. Graduation symbols instantly communicate the occasion and make your design feel intentional and festive.
Focus on one or two strong symbolic elements rather than overcrowding the cake. Clean, centered placement always looks more polished than too many scattered decorations.
Graduation Cap Topper
The graduation cap is the most recognizable symbol and works beautifully as a focal point.
You can:
- Buy a ready-made topper for convenience and a clean finish. Acrylic or cardstock toppers are sturdy and easy to insert.
- Make one using fondant by shaping a small square for the top and a round base for the headpiece.
- Create a simple DIY version using a chocolate square placed on a small candy or frosting mound, then add a thin strip of fondant or piped icing for the tassel.
- Place the cap in the center of the cake or slightly off-center for a modern look.
Diploma Design
A diploma scroll adds elegance and balance to your design.
Roll white fondant into a small scroll shape and gently pinch the ends to create a realistic look. Tie it with a thin strip of colored fondant or edible ribbon in the graduate’s school color. Position it beside the cap or slightly angled for visual interest.
Tassels & Stars
Smaller piped details help fill empty spaces without making the cake look cluttered.
Use a star piping tip to pipe small stars, dots or borders around the edges. You can also pipe a simple tassel design near the graduation year for added detail. Metallic edible dust (gold or silver) can lightly highlight these accents for a celebratory touch.
Design Tip: Keep decorations centered and balanced. Choose one main focal point (like the cap) and let smaller elements support it. Clean spacing and symmetry make even simple decorations look professional and photo-ready.
Step 5: Write a Clear Graduation Message
Your cake message should be short and bold:
- “Congrats, Grad!”
- “Class of 2026”
- “You Did It, [Name]!”
Use a round piping tip for clean lettering. Practice on parchment paper first if you’re unsure.
Pro Tip: Dark frosting on light cake (or vice versa) improves readability.
Step 6: Personalize It for the Graduate
This is where your cake becomes more than just dessert; it becomes a meaningful tribute. Personal touches make the design memorable and show that the celebration is truly about the graduate’s journey and future.
Instead of adding more decorations, focus on details that reflect who they are and where they’re headed.
Add Their Future Plans
Incorporating symbols of the graduate’s next chapter adds emotional value to the cake.
- Books for a literature or education major
- Stethoscope or medical cross for medical school
- Calculator, gears, or an atom symbol for engineering or science
- Sports ball or jersey number for an athlete who graduates
These elements can be made with fondant, piped in buttercream,m or added as small toppers. Keep them subtle and well-spaced so the cake remains clean and elegant.
Add a Photo Topper
Edible printed photo toppers are extremely popular because they instantly personalize the cake. You can use a graduation portrait, a childhood photo or even a side-by-side “then and now” image.
Photo toppers create a strong focal point and make the cake highly shareable on social media. If using one, keep surrounding decorations minimal so the image stands out clearly.
Add a Favorite Flavor Twist
Another way to personalize the cake is through flavor accents. This makes the cake feel tailored rather than generic.
Incorporate their favorite with:
- A smooth chocolate drizzle
- A caramel drip effect
- Fresh fruit topping
- Cookie crumbles or candy pieces
Flavor details are often remembered just as much as visual ones.
Remember: Personal details always matter more than complicated decorations. A simple cake that reflects the graduate’s personality will feel far more special than an overly elaborate design.
Step 7: Keep It Photo-Ready
Graduation cakes are photographed frequently at the dessert table, during candle moments, and in family pictures. A photo-ready cake ensures it looks great both in person and on camera.
To make yours stand out:
- Keep spacing clean so each element has room to breathe
- Avoid overcrowding the surface with too many decorations
- Center the main topper for visual balance
- Make sure the graduation year is clearly visible and easy to read
Strong contrast between the background and lettering improves photo clarity. For example, dark text on a light cake or metallic gold on a bold school color works beautifully.
When in doubt, choose simple and bold. Clear designs photograph better, look more professional, and leave a stronger impression.
Must read – how to decorate a pumpkin cake for halloween
Simple Decoration Ideas (Quick Inspiration List)
If you want fast inspiration, here are easy decorating combinations:
- White sheet cake + black border + gold “Class of 2026” topper
- Chocolate cake + school color rosettes + diploma fondant
- Ice cream cake + sprinkle border + acrylic grad cap topper
- Pull-apart cupcakes arranged as “2026.”
Final Thoughts
Decorating a graduation cake doesn’t have to be complicated. The key is combining three elements:
Color + Symbol + Personal Message
Whether you choose a crowd-feeding sheet cake, cupcakes for easy serving, or a fun ice cream cake, your decoration should celebrate the graduate’s hard work and next chapter.
Remember, the best graduation cakes aren’t the most complicated ones. They’re the ones that feel personal, joyful,l and made with intention.
Common Questions
You typically add school colors, a graduation cap, a diploma, the graduate’s name, and the class year.
A sheet cake is the easiest because it provides a large flat surface for writing and decorating.
Yes. You can use buttercream piping, toppers, sprinkles and edible prints instead of fondant.
Use the graduate’s school colors, or neutral shades like white, black, gold or silver for a classy look.